
OpenClaw Hardened Deployment: A Non-Technical Companion Guide
Securely deploy OpenClaw using Ansible and Podman containers. This hardening guide covers network isolation, API budget caps, and egress filtering for AI agents.

This is a companion to the OpenClaw Security Guide: Step-by-Step Hardening by Tier. That guide was written for people comfortable with Linux, networking, and security concepts. This one is for everyone else.
If you watched a YouTube video about OpenClaw, thought “I want that,” but have never SSH’d into a server or heard the word “Ansible” before, this is your guide. We’re going to get you from zero to a fully hardened OpenClaw deployment, step by step, with explanations for every command.
What you’ll have at the end: A secure, isolated OpenClaw instance running on a remote server (or spare hardware), accessible from your phone or laptop via HTTPS, with all the security hardening from the main guide applied automatically.
What you need to start: A computer (Mac, Windows, or Linux), a credit card for the server (if using Hetzner or AWS), and about 90 minutes of focused time.
Before You Start: The Rules
These rules come from the main security guide. They apply regardless of how you deploy.
Never run OpenClaw on your primary computer. Not your laptop. Not your desktop. Not the Mac you use for work. OpenClaw gets its own machine, whether that’s a rented server or an old laptop in your closet.
Never connect important accounts. No primary email. No banking. No work Slack. No password managers. No social media you care about. Only connect burner accounts you could lose without caring. If you’re unsure whether an account counts, don’t connect it.
This is not a “set and forget” tool. You will need to check on it monthly. If that sounds like too much, use Claude.ai directly instead.
Read those three rules again. If any of them are dealbreakers, stop here and use Claude.ai. Seriously. It’s a better product for most people, and it doesn’t require any of this.
Still here? Let’s go.
Choose Where to Run OpenClaw
You have three options. Pick one.
Option A: Hetzner Cloud (Recommended)
Best for most people. Hetzner is a European hosting company with cheap, reliable servers. A server powerful enough for OpenClaw costs about €3.50/month (roughly $4 USD). You’re renting a computer in a data center. You don’t need to worry about electricity, hardware failures, or keeping it physically secure.
Option B: AWS (Amazon Web Services)
Best if you already have an AWS account or your employer pays for it. AWS is more expensive ($8-15/month for equivalent specs) and more complex to set up. The interface is overwhelming if you’ve never used it. But if you’re already in the AWS ecosystem, it works fine.
Option C: Local Hardware
Best if you have a spare computer collecting dust. An old laptop, a Mac Mini, a retired desktop. It needs to run Linux (we’ll cover that), stay powered on, and be connected to your home network. Cost is just electricity ($5-10/month), but you’re responsible for everything: power outages, hardware failures, network configuration.
My recommendation: If you don’t already have strong opinions, go with Hetzner. It’s the cheapest, the simplest, and the easiest to destroy and rebuild if something goes wrong.
Jargon You’ll Encounter
Before we start, here are terms that will come up. You don’t need to memorize these. Just know they exist so you’re not confused when you see them.
Server / VPS: A computer you rent from a company like Hetzner or AWS. It runs 24/7 in a data center somewhere. VPS stands for Virtual Private Server. It’s “virtual” because one physical machine is split into multiple isolated servers. You get your own slice.
SSH: Secure Shell. A way to connect to a remote computer and type commands into it. Think of it like a text message conversation with a computer. You type a command, it types back a response.
Terminal: The application on your computer where you type commands. On Mac it’s called Terminal (found in Applications → Utilities). On Windows it’s called PowerShell or Windows Terminal. On Linux it depends on your distribution, but you probably already know this.
IP Address: A number that identifies a computer on the internet, like 49.12.45.67. When you create a server, it gets an IP address. You use this address to connect to it.
SSH Key: A pair of files (one public, one private) used instead of a password to log into servers. The public key goes on the server. The private key stays on your computer. It’s like a lock and key: the server has the lock, you have the key, and nobody else can get in.
Ansible: A tool that automates server setup. Instead of typing 200 commands by hand, you run one Ansible “playbook” and it does everything for you. Think of it as an instruction manual that executes itself.
Tailscale: A tool that creates a private, encrypted network between your devices. Once installed, your phone, laptop, and server can talk to each other securely without exposing anything to the public internet.
Container: A lightweight, isolated box that runs a program. Think of it like an apartment in a building: each apartment (container) is separate, with its own locks and walls, even though they share the same building (server). OpenClaw runs inside containers so that if something goes wrong, the damage stays inside the box.
HTTPS: Encrypted web traffic. When you see a padlock icon in your browser, that’s HTTPS. The playbook sets up HTTPS for the OpenClaw dashboard using a self-signed certificate.
Part 1: Set Up Your Computer
Before you touch any server, your own computer needs a few tools installed.
Step 1: Open Your Terminal
Mac: Press Cmd + Space, type “Terminal”, press Enter. A window with a text prompt will appear. This is where you’ll type commands for the rest of this guide.
Windows: You need Windows Subsystem for Linux (WSL). Open PowerShell as Administrator (right-click the Start menu → “Windows PowerShell (Admin)”) and run:
wsl --install
Restart your computer when prompted. After restart, open the Start menu and search for “Ubuntu.” That’s your terminal from now on. Everything in this guide assumes you’re typing commands in the Ubuntu terminal, not PowerShell.
Linux: Open your terminal emulator. You know how.
Step 2: Install Ansible
Ansible is the tool that will configure your server automatically. Install it on your computer (not on the server).
Mac:
# Install Homebrew first (if you don't have it)
/bin/bash -c "$(curl -fsSL https://raw.githubusercontent.com/Homebrew/install/HEAD/install.sh)"

# Install Ansible
brew install ansible

# Verify it worked
ansible --version
If the ansible --version command prints a version number (2.10 or higher), you’re good.
Windows (inside WSL/Ubuntu):
sudo apt update
sudo apt install ansible -y
# Verify it worked
ansible --version
Linux (Debian/Ubuntu):
sudo apt update
sudo apt install ansible -y
# Verify it worked
ansible --version
Linux (Arch):
sudo pacman -S ansible
# Verify it worked
ansible --version
If you see an error instead of a version number, don’t proceed. The most common fix is running sudo apt update first, then trying the install again.
Step 3: Install Tailscale on Your Computer
Tailscale is how you’ll securely access OpenClaw from your devices.
Go to
https://tailscale.com
and create a free account. Then install Tailscale on the computer you’re using right now:
Mac: Download from https://tailscale.com/download/mac or install via Homebrew:
brew install tailscale
Windows: Download from https://tailscale.com/download/windows and run the installer.
Linux:
curl -fsSL https://tailscale.com/install.sh | sh
sudo tailscale up
After installing, sign in to Tailscale. You’ll see your computer listed in the Tailscale admin panel at https://login.tailscale.com/admin/machines.
Also install Tailscale on your phone if you want to access OpenClaw from it. It’s in the App Store (iOS) and Play Store (Android).
Step 4: Generate an SSH Key
An SSH key lets you log into your server securely without a password.
Check if you already have one:
ls ~/.ssh/id_ed25519.pub
If that prints a file path, you already have a key. Skip to the next step.
If it says “No such file or directory,” generate one:
ssh-keygen -t ed25519 -C "openclaw-server"
It will ask where to save it. Press Enter to accept the default. It will ask for a passphrase. You can press Enter twice to skip the passphrase (less secure but simpler), or type a passphrase you’ll remember.
Now view your public key:
cat ~/.ssh/id_ed25519.pub
This prints a long line starting with ssh-ed25519. Copy this entire line. You’ll need it when creating your server. Keep this terminal window open.
Step 5: Clone the Ansible Playbook
Download the hardening playbook to your computer:
cd ~
git clone https://github.com/Next-Kick/openclaw-hardened-ansible.git
cd openclaw-hardened-ansible
chmod +x deploy.sh update-allowlist.sh
If git isn’t installed, install it first:
# Mac
brew install git
# Ubuntu/Debian/WSL
sudo apt install git -y
Then run the git clone command again.
Your computer is now ready. Time to create the server.
Part 2A: Create a Server on Hetzner (Recommended)
Step 1: Create a Hetzner Account
Go to https://www.hetzner.com/cloud and click “Register.” Enter your email and create a password. You’ll need to verify your email and add a payment method (credit card).
Step 2: Create a New Project
After logging in, you’ll see the Hetzner Cloud Console. Click “New Project” and name it something like “OpenClaw.” Click into the project.
Step 3: Add Your SSH Key
Before creating a server, add your SSH key so you can log in.
Click “Security” in the left sidebar, then “SSH Keys,” then “Add SSH Key.”
Paste the public key you copied earlier (the ssh-ed25519 ... line). Name it something like “My Laptop.” Click “Add SSH Key.”
Step 4: Create the Server
Click “Servers” in the left sidebar, then “Add Server.”
Location: Pick whichever is closest to you. If you’re in the US, choose Ashburn or Hillsboro. In Europe, choose Falkenstein or Helsinki. It doesn’t matter much.
Image (operating system): Select Ubuntu 24.04.
Type: Under “Shared vCPU,” select CX22 (2 vCPU, 4 GB RAM). This costs €4.35/month and is plenty for OpenClaw. If you plan to run a local LLM (like Ollama), you’ll need something beefier, but for using Anthropic/OpenAI APIs through LiteLLM, CX22 is fine.
Networking: Leave defaults (Public IPv4 and IPv6).
SSH Keys: Check the box next to the SSH key you just added.
Name: Give it a name like openclaw-server.
Click “Create & Buy Now.” In about 30 seconds, your server will be ready. You’ll see an IP address (something like 49.12.45.67). Write this down or copy it. This is your server’s address.
Step 5: Verify You Can Connect
Back in your terminal, test the SSH connection:
ssh root@YOUR_SERVER_IP
Replace YOUR_SERVER_IP with the IP address from Step 4 (e.g., ssh root@49.12.45.67).
The first time you connect, it will ask “Are you sure you want to continue connecting?” Type yes and press Enter.
If you see a root@openclaw-server:~# prompt, you’re in. Type exit to disconnect. If you get “Permission denied” or “Connection refused,” double-check that you selected your SSH key when creating the server.
You’re done with Hetzner setup. Skip ahead to Part 3: Deploy OpenClaw.
Part 2B: Create a Server on AWS
AWS is more complex than Hetzner. If the steps below feel overwhelming, go back and use Hetzner instead. There’s no shame in choosing the simpler path.
Step 1: Create an AWS Account
Go to
https://aws.amazon.com
and click “Create an AWS Account.” You’ll need an email, credit card, and phone number for verification. AWS has a free tier, but the instances that qualify are too small for OpenClaw. Expect to pay $8-15/month.
Step 2: Navigate to EC2
After logging into the AWS Console, use the search bar at the top and type “EC2.” Click “EC2” in the results. This is AWS’s virtual server service.
Step 3: Import Your SSH Key
In the EC2 dashboard, click “Key Pairs” in the left sidebar under “Network & Security.” Click “Actions” → “Import Key Pair.”
Name it openclaw-key. Paste your public key (the ssh-ed25519 ... line) into the text box. Click “Import Key Pair.”
Step 4: Create a Security Group
A security group is a firewall for your server. In the left sidebar, click “Security Groups” under “Network & Security.” Click “Create Security Group.”
Name: openclaw-sg Description: OpenClaw server firewall VPC: Leave the default.
Inbound rules: Click “Add Rule.”
Type: SSH, Source: My IP (this auto-fills your current IP address)
That’s the only inbound rule you need. Tailscale handles everything else.
Outbound rules: Leave the default (all traffic allowed).
Click “Create Security Group.”
Step 5: Launch the Instance
Click “Instances” in the left sidebar, then “Launch Instances.”
Name: openclaw-server
Application and OS Images: Click “Ubuntu” and select Ubuntu Server 24.04 LTS.
Instance type: Select t3.medium (2 vCPU, 4 GB RAM). This costs roughly $0.0416/hour, or about $30/month if running 24/7. For a cheaper option, try t3.small (2 vCPU, 2 GB RAM) at roughly $15/month, but performance will be tighter.
Key pair: Select openclaw-key (the one you imported).
Network settings: Click “Edit.” Under “Firewall (security groups),” select “Select existing security group” and choose openclaw-sg.
Configure storage: Change to 30 GiB (the default 8 GB is too small).
Click “Launch Instance.” Wait about a minute, then click “View all instances.” Your instance will show “Running” with a Public IPv4 address. Copy this address.
Step 6: Verify You Can Connect
ssh ubuntu@YOUR_SERVER_IP
Note: AWS Ubuntu instances use the username ubuntu, not root.
If you see an ubuntu@ip-xxx:~$ prompt, you’re in. Type exit to disconnect.
Important for Part 3: When running the Ansible playbook, use ubuntu as the SSH user instead of root.
You’re done with AWS setup. Skip ahead to Part 3: Deploy OpenClaw.
Part 2C: Set Up Local Hardware
This path requires a spare computer you’re willing to dedicate to OpenClaw. An old laptop works perfectly. A Mac Mini, a retired desktop, or even a Raspberry Pi 5 (with 8 GB RAM) will do.
Step 1: Install Ubuntu Server
Download Ubuntu Server 24.04 LTS from https://ubuntu.com/download/server.
You’ll need a USB flash drive (at least 4 GB). Use a tool to create a bootable USB:
Mac: Use balenaEtcher (
https://etcher.balena.io
). Download it, open it, select the Ubuntu ISO, select your USB drive, click Flash.
Windows: Use Rufus (
https://rufus.ie
). Download it, open it, select the Ubuntu ISO, select your USB drive, click Start.
Linux: Use dd or balenaEtcher.
Plug the USB drive into your spare computer. Power it on and boot from USB. This usually requires pressing F12, F2, Del, or Esc during startup to access the boot menu. It varies by manufacturer.
Follow the Ubuntu Server installer:
Select your language and keyboard layout
Choose “Ubuntu Server” (not the minimized version)
Configure network (use DHCP, which is the default)
Skip proxy configuration
Use the default mirror
Use the entire disk (default partitioning is fine)
Create a user account. Username:
openclaw. Password: something strong you’ll rememberInstall OpenSSH server: Check this box. This is critical
Don’t select any additional snaps
Wait for installation to complete, then reboot and remove the USB drive
Step 2: Find Your Server’s IP Address
After Ubuntu boots, log in with the username and password you created. Then run:
ip addr show | grep "inet " | grep -v 127.0.0.1
You’ll see a line containing something like 192.168.1.105/24. The part before the / is your local IP address. Write it down.
Step 3: Copy Your SSH Key to the Server
From your main computer’s terminal (not the server):
ssh-copy-id openclaw@YOUR_SERVER_LOCAL_IP
Replace YOUR_SERVER_LOCAL_IP with the IP from Step 2 (e.g., ssh-copy-id openclaw@192.168.1.105). Type the server’s password when prompted.
Step 4: Verify You Can Connect
ssh openclaw@YOUR_SERVER_LOCAL_IP
If you get in without being asked for a password, the SSH key is working. Type exit.
Step 5: Make the Server’s IP Static (Recommended)
By default, your router may assign a different IP to the server each time it reboots. To prevent this, log into your router’s admin page (usually
http://192.168.1.1
) and find the DHCP reservation or static lease option. Assign a permanent IP to your server’s MAC address. The exact steps depend on your router model.
Alternatively, configure a static IP on the server itself. While logged into the server:
sudo nano /etc/netplan/01-netcfg.yaml
Replace the contents with (adjusting for your network):
network:
version: 2
ethernets:
eth0:
dhcp4: no
addresses:
- 192.168.1.105/24
routes:
- to: default
via: 192.168.1.1
nameservers:
addresses:
- 1.1.1.1
- 8.8.8.8
sudo netplan apply
Important for Part 3: When running the Ansible playbook, use openclaw as the SSH user (or root if you set up root access). Your target IP is the local address (e.g., 192.168.1.105).
You’re done with local hardware setup. Continue to Part 3: Deploy OpenClaw.
Part 3: Deploy OpenClaw
This is the part where the Ansible playbook does the heavy lifting. Whether you used Hetzner, AWS, or local hardware, the process is the same from here.
Step 1: Navigate to the Playbook Directory
On your computer (not the server), open your terminal:
cd ~/openclaw-hardened-ansible
Step 2: Decide on Your LLM Provider
OpenClaw needs a language model to work. You have three main options:
Anthropic (Recommended for beginners): You’ll need an API key from
https://console.anthropic.com
.
Sign up, add billing, and create an API key. Copy the key (it starts with sk-ant-). This costs money per use, typically $10-30/month depending on how much you use it.
OpenAI: Same idea, different provider. Get an API key from https://platform.openai.com/api-keys.
Ollama (Free, but requires beefy hardware): Runs the AI model locally on your server. Free to use, but your server needs significant RAM (16 GB+) and ideally a GPU. Not practical on a €4 Hetzner VPS. Only use this if you have powerful local hardware or a high-end VPS.
For this guide, we’ll assume you’re using Anthropic. The playbook supports all three.
Step 3: Run the Deployment
The deploy.sh script is flexible. You can run it and follow the prompts, or you can provide your settings directly if you’re comfortable with the terminal.
Option A: Interactive (Recommended)
Simply run the script and answer the questions.
./deploy.sh
Option B: Using an SSH Key (Best for VPS)
If you are connecting to a server like Hetzner or AWS where you have a .pem or .key file:
./deploy.sh \
  --target YOUR_SERVER_IP \
  --ssh-user root \
  --ssh-key ~/.ssh/id_ed25519
Option C: Advanced / Local Hardware (Ollama Example)
If you want to provide all settings at once (e.g., for a local server with Ollama):
./deploy.sh \
   -t 10.0.110.100 \
   --ssh-user fernando \
   --ask-pass \
   -p ollama \
   -m "deepseek-r1:8b" \
   -u "http://10.0.100.25:11434" \
   --non-interactive
Note: The --ask-pass flag will prompt you for the SSH and Sudo passwords. The --non-interactive flag ensures the script doesn’t ask further questions.
The script will ask you several questions (if not provided as parameters):
“Enter Target Host IP:” Type the IP address of your server.
Hetzner: The IP from your Hetzner Cloud Console (e.g.,
49.12.45.67)AWS: The Public IPv4 from your EC2 dashboard
Local: The local IP of your spare computer (e.g.,
192.168.1.105)
“Enter Initial SSH User:”
Hetzner: Type
rootAWS: Type
ubuntuLocal: Type
openclaw(or whatever username you created during Ubuntu installation)
“Select LLM Provider:” Type 2 for Anthropic (or 3 for OpenAI, 1 for Ollama).
“Enter API Key:” Paste your Anthropic API key (starts with sk-ant-).
The script will show you a summary of what it’s about to do. Confirm, and then sit back. The playbook runs for 10-20 minutes.
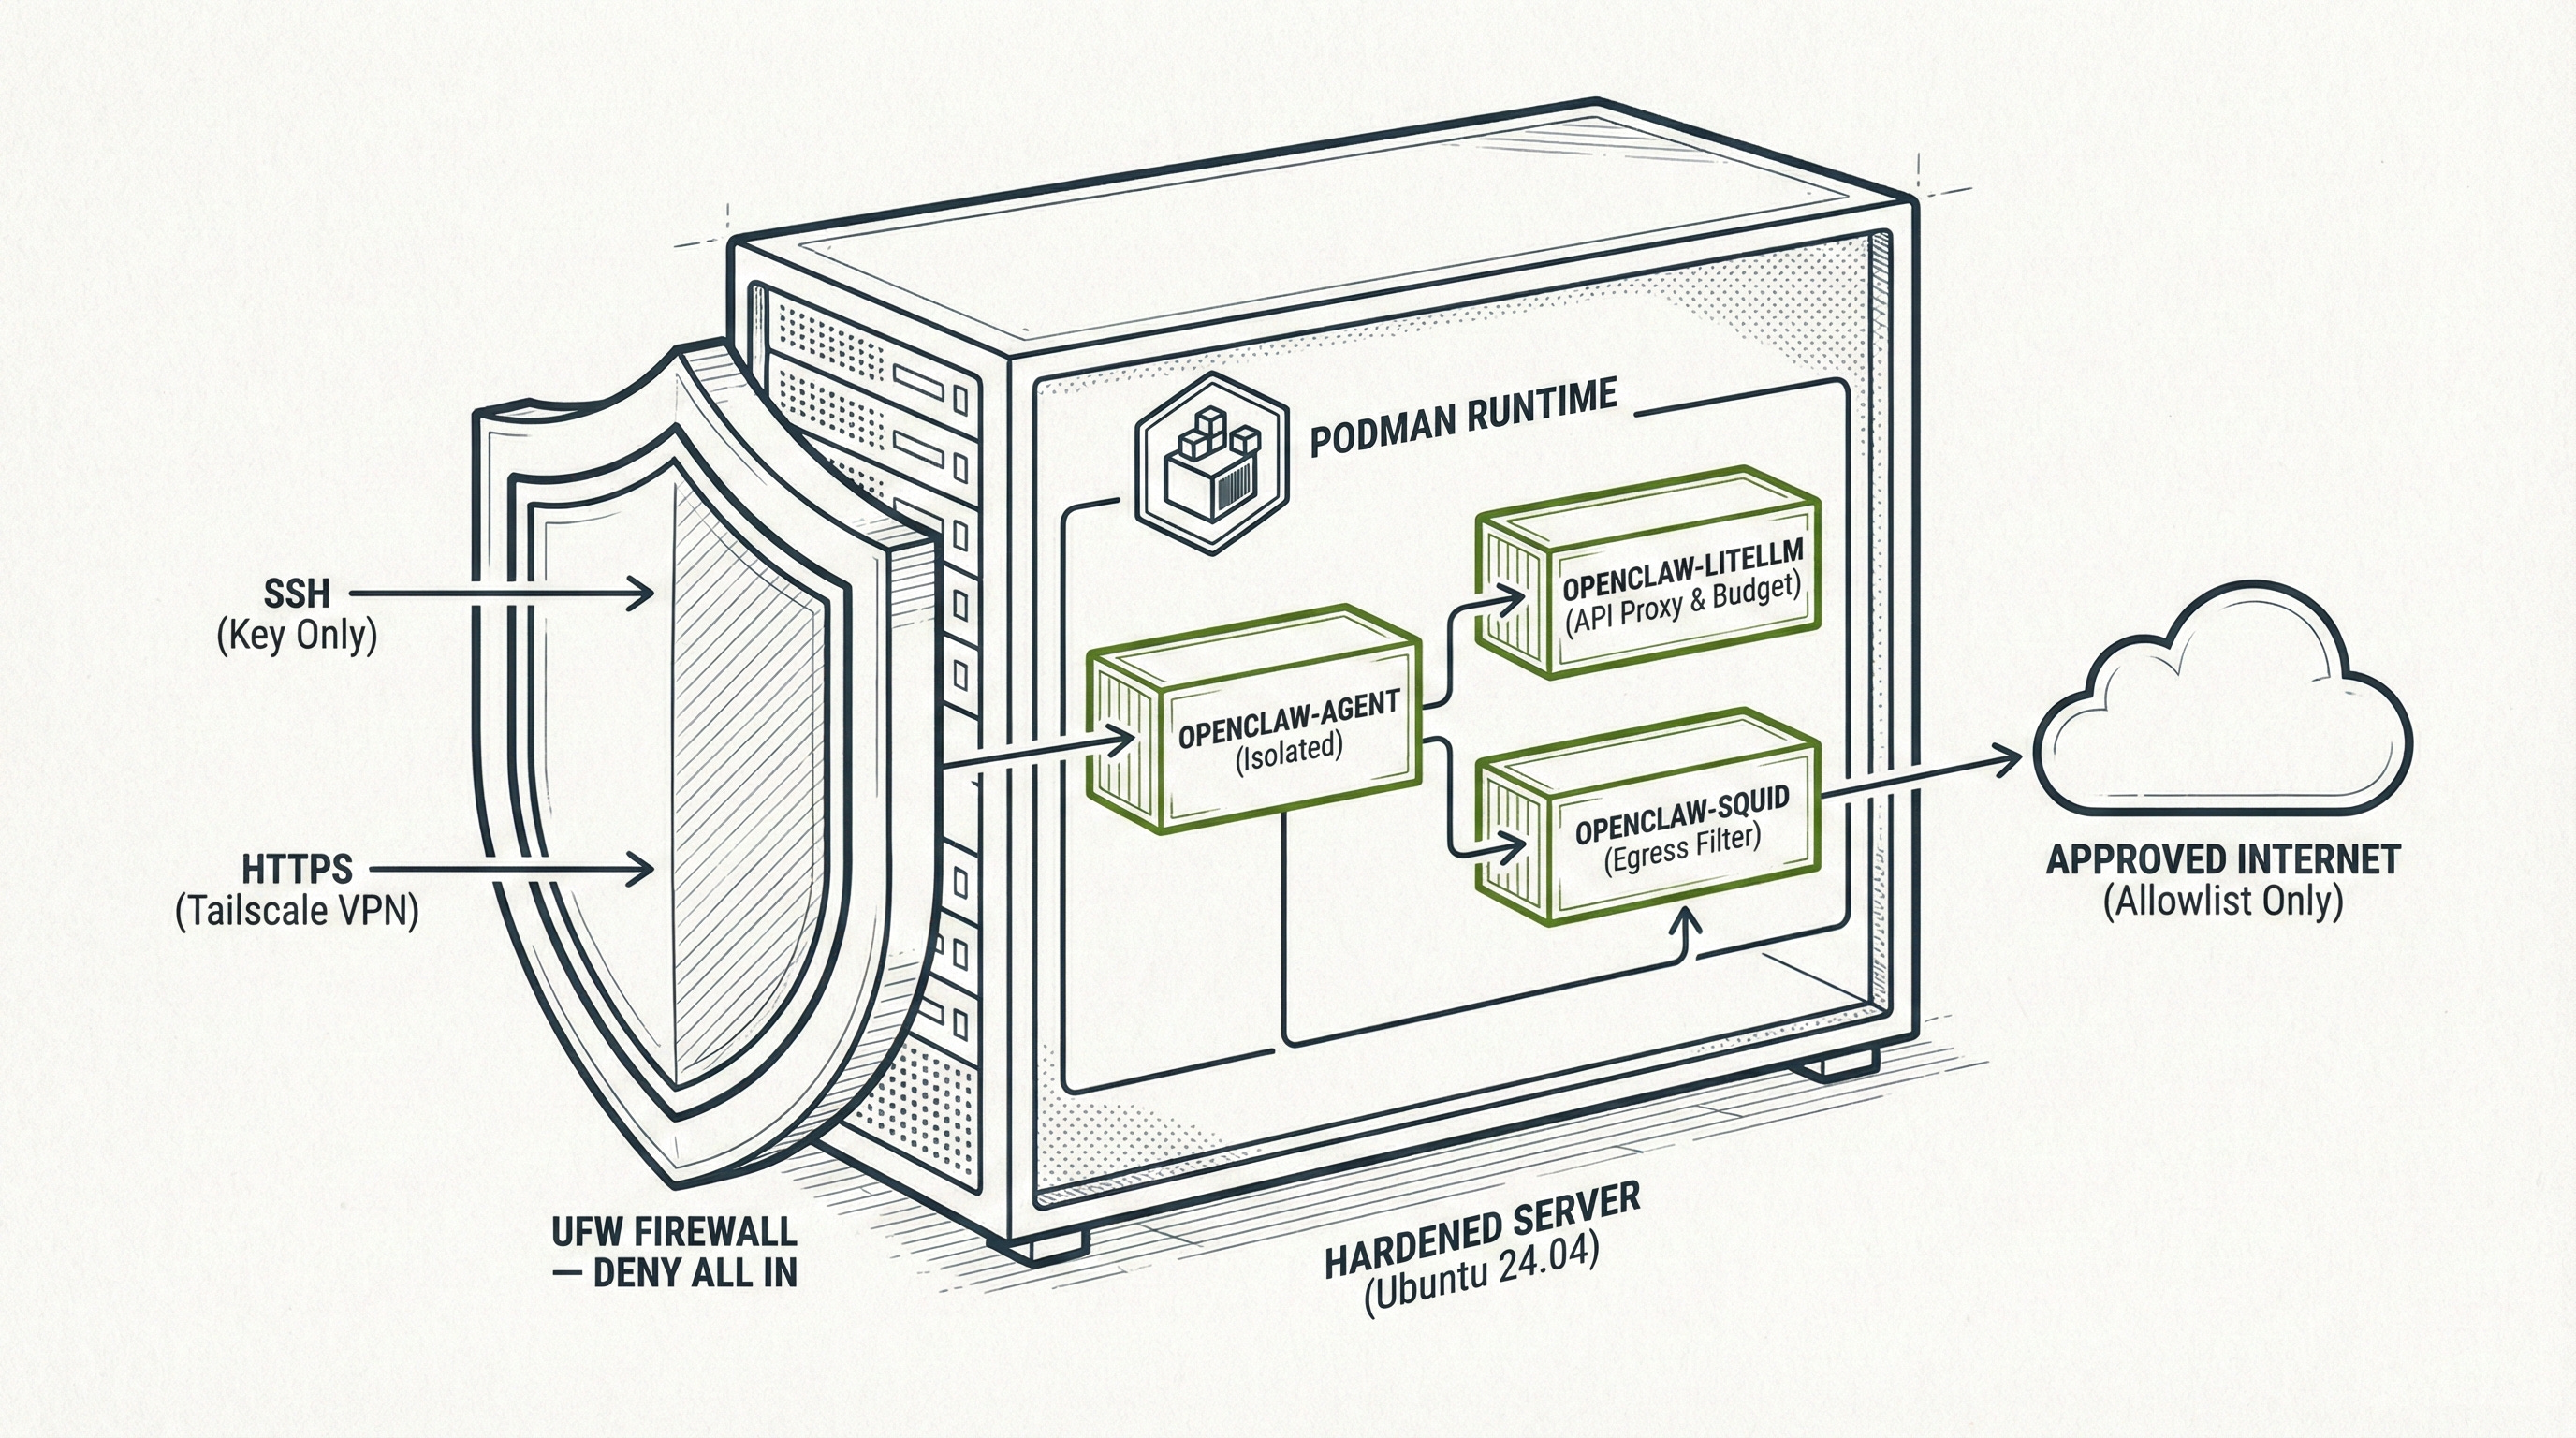
Part 4: What the Playbook Actually Did
You don’t need to understand all of this, but here’s what happened behind the scenes.
The playbook created a dedicated openclaw user on the server, disabled password login, and configured a firewall (UFW) to block everything except SSH and the secure OpenClaw port.
It installed Podman, a secure container runtime, and deployed three containers:
openclaw-agent: The OpenClaw instance itself. It now handles its own HTTPS encryption using a self-signed certificate. It is isolated on a private network and cannot reach the internet directly.
openclaw-litellm: A proxy that sits between OpenClaw and your AI provider (Anthropic, OpenAI, etc.). Your real API key lives here, and LiteLLM enforces budget caps so an agent can’t accidentally spend thousands of dollars.
openclaw-squid: A web proxy that acts as a “bouncer.” OpenClaw can only talk to websites you’ve explicitly allowed (like GitHub or Telegram). Everything else is blocked.
All of this adds up to multiple layers of isolation: your server is separate from your computer, the containers are separate from each other, and the network is locked down.
Part 5: Ongoing Maintenance
Hardening isn’t a one-time thing. Plan to spend 30 minutes once a month on maintenance.
Monthly Checklist
Connect to your server:
ssh -i ssh-keys/YOUR_HOSTNAME.pem openclaw@YOUR_SERVER_IP
Check that containers are running:
podman ps
You should see three containers (openclaw-agent, openclaw-litellm, openclaw-squid) with status “Up.” If any are missing or showing “Exited,” restart them:
cd ~/openclaw-docker
podman-compose down
podman-compose up -d
Update the system:
sudo apt update && sudo apt upgrade -y
If it says a reboot is required:
sudo reboot
Wait a minute, then SSH back in. Containers should start automatically.
Check security logs:
cat ~/openclaw-docker/security-audit-*.log | tail -50
Look for any lines containing “CRITICAL” or “WARNING.” If you see them, something needs attention. The most common issues and fixes:
“Port 18789 exposed to internet”: This shouldn’t happen with the default configuration. Run
sudo ufw statusto check firewall rules“Device auth disabled”: Check
~/openclaw-docker/openclaw-data/openclaw.jsonand verify device authentication settings
Check the Squid proxy logs for blocked requests:
podman logs openclaw-squid --since 720h | grep TCP_DENIED | tail -20
This shows domains that OpenClaw tried to reach but was blocked from accessing. If you see a domain you actually need, add it to the allowlist:
echo ".example.com" >> ~/openclaw-docker/allowlist.txt
podman exec openclaw-squid squid -k reconfigure
Review API usage:
Log into your Anthropic dashboard (
https://console.anthropic.com
) and check your usage. If you see unexpected spikes, that could indicate a compromised agent.
Part 6: Common Tasks
Restarting OpenClaw
If OpenClaw is behaving strangely or you’ve changed configuration:
ssh -i ssh-keys/YOUR_HOSTNAME.pem openclaw@YOUR_SERVER_IP
cd ~/openclaw-docker
podman-compose restart
Stopping OpenClaw Completely
cd ~/openclaw-docker
podman-compose down
Starting OpenClaw After a Stop
cd ~/openclaw-docker
podman-compose up -d
Viewing Live Logs
To watch what OpenClaw is doing in real time:
cd ~/openclaw-docker
podman-compose logs -f
Press Ctrl+C to stop watching.
Adding a Domain to the Allowlist
If OpenClaw needs to access a new website or API:
# Add the domain (include the leading dot)
echo ".newdomain.com" >> ~/openclaw-docker/allowlist.txt
# Reload without restarting
podman exec openclaw-squid squid -k reconfigure
Updating OpenClaw
To pull the latest container images:
cd ~/openclaw-docker
podman-compose pull
podman-compose up -d
Destroying Everything and Starting Over
If something goes wrong and you want a clean slate:
Hetzner: Delete the server in the Hetzner Cloud Console and create a new one. Run the playbook again.
AWS: Terminate the EC2 instance and launch a new one. Run the playbook again.
Local: Reinstall Ubuntu and run the playbook again.
The playbook is designed to be rerun. Your secrets (API keys, gateway tokens) are preserved across redeployments if the .env file still exists, so you won’t lose access to your dashboard.
Part 7: Emergency Procedures
If you suspect OpenClaw has been compromised (strange behavior, unexpected API charges, tools running commands you didn’t authorize), act fast.
Step 1: Kill It
ssh -i ssh-keys/YOUR_HOSTNAME.pem openclaw@YOUR_SERVER_IP
cd ~/openclaw-docker
podman-compose down
sudo ufw deny out to any
sudo ufw deny in from any
This stops all containers and blocks all network traffic. Nothing gets in or out.
Step 2: Revoke Everything
From a different device (not the compromised server):
Anthropic API key: Go to https://console.anthropic.com/settings/keys and revoke all keys
OpenAI API key: Go to https://platform.openai.com/api-keys and revoke all keys
Any connected accounts: Revoke access in each service’s security settings (Gmail at https://myaccount.google.com/permissions, GitHub at https://github.com/settings/applications, etc.)
Change passwords for any accounts that were connected, even burner accounts
Step 3: Rebuild
Do not try to clean the compromised server. Destroy it and start fresh.
Hetzner: Delete the server. Create a new one. Run the playbook again.
AWS: Terminate the instance. Launch a new one. Run the playbook again.
Local: Wipe the drive and reinstall Ubuntu. Run the playbook again.
cd ~/openclaw-hardened-ansible
./deploy.sh
Use a new API key. Do not reuse credentials from the compromised deployment.
Troubleshooting
“I can’t SSH into my server.”
Check that you’re using the right IP, the right username, and the right SSH key. For Hetzner, the user is root (before playbook) or openclaw (after playbook). For AWS, it’s ubuntu (before playbook) or openclaw (after). For local, it’s whatever you set during Ubuntu installation.
If you’re using the post-playbook connection, make sure you’re pointing to the right .pem file:
ssh -i ssh-keys/YOUR_HOSTNAME.pem openclaw@YOUR_SERVER_IP
“The dashboard isn’t loading.”
Make sure you’re using HTTPS (not HTTP):
https://100.x.x.x:18789
Check that Tailscale is active on both your device and the server.
SSH in and verify containers are running:
podman ps
You should see three containers. If fewer are listed:
cd ~/openclaw-docker
podman-compose up -d
“My browser says the connection is not secure.”
This is expected with self-signed certificates. Click “Advanced” → “Proceed” to continue. The connection is encrypted; it’s just not verified by a third party.
“I can’t log in to the dashboard.”
Make sure you’re using the correct gateway token. Retrieve it again:
ssh -i ssh-keys/YOUR_HOSTNAME.pem openclaw@YOUR_SERVER_IP
cat ~/openclaw-docker/.env | grep OPENCLAW_GATEWAY_TOKEN
If you’ve already authenticated but can’t access the dashboard, you may need to approve your device:
podman exec openclaw-agent openclaw devices pending
podman exec openclaw-agent openclaw devices approve YOUR_DEVICE_ID
“Ansible failed partway through.”
Read the error message. The most common causes are network timeouts (try again) and SSH authentication failures (verify your key). The playbook is safe to rerun. Just execute ./deploy.sh again with the same settings.
“I forgot my server’s IP.”
For Hetzner, log into
https://console.hetzner.cloud
and look at your server list. For AWS, check the EC2 Instances page. For local, check your router’s connected devices list.
The Tailscale IP is always visible at https://login.tailscale.com/admin/machines.
“I want to change my LLM provider.”
SSH into the server and edit the LiteLLM configuration:
cd ~/openclaw-docker
nano litellm-config.yaml
Update the model and API key. Then edit .env to update the ANTHROPIC_API_KEY (or add the new provider’s key). Restart:
podman-compose down
podman-compose up -d
“How much is this costing me?”
Hetzner CX22: about $4/month. Anthropic API: $10-30/month depending on usage. Tailscale: free for personal use. Total: roughly $15-35/month for most people.
AWS is more expensive. A t3.medium runs about $30/month, plus API costs.
Local hardware costs only electricity ($5-10/month) plus API costs.
What This Guide Didn’t Cover
This guide focused on getting you deployed quickly using the Ansible playbook. The main OpenClaw Security Guide covers things this guide intentionally skipped:
Manual (non-Ansible) deployment for learning
Detailed explanations of each security layer
Advanced configurations (custom exec approval policies, agent risk profiles, credential rotation schedules)
The full list of accounts you should never connect and why
What hardening cannot protect against (prompt injection, supply chain attacks)
If you want to understand what’s actually running on your server and why, read the main guide. It takes about 90 minutes to read through and will give you a much deeper understanding of what the Ansible playbook automated for you.
Remember the rules. Only burner accounts. Monthly maintenance. If something feels wrong, shut it down first and investigate second. The playbook automated the hard parts, but vigilance is still on you.
Peace. Stay curious! End of transmission.
This is great! I like that you included an emergency procedure. solid advice. Also nice job predicting the p22 trouble, if people are a bit new that's usually a pitfall.
Great read!
This is thorough. The Ansible approach makes sense if you want full control over every layer. For anyone who doesn't need that level of customisation though, Laravel Forge recently added OpenClaw as a server type. Five minutes, no Ansible, no manual hardening. I wrote a walkthrough here: https://reading.sh/laravel-forge-can-now-run-openclaw-not-just-your-websites-65c248964223. Different tradeoffs obviously, but worth knowing both options exist.